最終更新日:2026年7月20日 at 11:30 AM

WordPress の記事一覧で記事の冒頭から指定文字数でカットし、”続きを読む” のリンク文字列を追記して抜粋表示するためのプラグイン Auto Limit Posts Reloaded について、以下の「JVN iPedia – 脆弱性対策情報データベース」でクロスサイトリクエストフォージェリ(CSRF)の脆弱性が報告されています。
既に WordPress のディレクトリからは、プラグインのダウンロードができなくなっています。
よって、このプラグインを使用しているWebサイトでは、このセキュリティ問題への対応が求められます。

目次
クロスサイトリクエストフォージェリ(CSRF)とは
これは、Copilot からの引用となりますが、一般的にクロスサイトリクエストフォージェリ(CSRF)に関する説明は、以下の通りです。
クロスサイトリクエストフォージェリ(CSRF)は、ユーザーが意図しない操作をWebアプリケーションに対して実行させる攻撃手法です。
たとえば、あるユーザーが銀行のWebサイトにログインしたまま、攻撃者が仕掛けた「罠サイト」にアクセスしてしまうと、そのサイトに仕込まれたスクリプトが勝手に送金処理を実行してしまう…というような被害が起こり得ます。
CSRFの特徴
- 攻撃対象:ログイン状態のWebアプリケーション
- 攻撃方法:ユーザーが罠リンクやボタンをクリックすることで、意図しないリクエストが送信される
- 被害例:不正送金、SNSでの勝手な投稿、アカウント情報の変更など
主な対策
- CSRFトークンの導入:フォームにランダムなトークンを埋め込み、正当なリクエストかを検証
- RefererやOriginヘッダのチェック:リクエスト元が正しいかを確認
- SameSite属性の設定:Cookieの送信を制限することで、外部サイトからのリクエストを防止
XSS(クロスサイトスクリプティング)と混同されがちですが、CSRFは「ユーザーの操作を偽装する」点がポイントです。
「Auto Limit Posts Reloaded」の機能をテーマのプログラムで代替
通常の使用方法であれば、このプラグインを使用し続けても特に問題はないのですが、プラグインのメンテナンスが3年間止まっていた事、セキュリティ問題を抱えている事、WordPress からのダウンロードが出来なくなり今後のメンテナンスが望めない事、などを勘案すれば、このプラグインをアンインストールし、テーマのプログラムで代替対応するのが適当と考え、functions.php へのスニペット追加(プログラム作成)で対応しました。
先ずは、その前提条件について、以下の通り説明します。
投稿の抜粋を出力する関数「the_excerpt」への書き換え
現在、当サイトでは、以下の記事に示す通り、記事一覧で抜粋文を適用する方式を採用しています。
即ち、テーマのブログ一覧やアーカイブページを表示するテンプレートパーツのプログラム(content.php)では、記事の抜粋を以下の関数コールで表示しています。
the_excerpt();当サイトでは、ジャストシステムが提供する ホームページビルダー22 (hpb22) のテーマのプログラムを使用しています。
ジャストシステムからは、新バージョン「ホームページビルダー23」がリリースされ、WordPress 6.7 に対応したそうですが、やっとブロックエディタに対応したくらいで、テーマのプログラムに関しては、恐らく大きな変更は無いと思います。
当サイトのシステム構成で、抜粋記事の表示を行うプログラムは、カスタム投稿タイプを含めると、以下の通りです。
- content.php
- blog.php
- blog_gallery.php(カスタム投稿)
- blog_news.php(カスタム投稿)
しかしながら、上記のプログラムにおいて、ブログとカスタム投稿を表示するオリジナルのプログラムでは、記事一覧で抜粋記事の表示をサポートしていません。
例としてブログ記事一覧(blog.php)では、以下の通り、マークされた16行目の関数コール 「the_content();」になっています。
						<h3><a href="<?php echo esc_attr( add_query_arg( $query_more, home_url( '' ) ) ); ?>">ブログ一覧</a></h3>
						<?php while ( $wp_query->have_posts() ) : $wp_query->the_post(); ?>
							<article id="post-<?php the_ID(); ?>" <?php post_class(); ?>>
								<header class="entry-header">
									<h4><a href="<?php the_permalink(); ?>"><?php the_title(); ?></a></h4>
								</header><!-- .entry-header -->

								<?php if ( has_post_thumbnail() ) : ?>
									<p class="entry-thumbnail"><?php the_post_thumbnail( 'thumbnail' ); ?></p>
								<?php endif; ?>

								<div class="entry-content">
									<?php
									global $more;
									$more = 0;
									the_content();
									?>
								</div><!-- .entry-content -->
そのため、この関数コールの部分(16行目)は以下のように修正しています。
						<h3><a href="/post/">ブログのアーカイブ</a></h3>
						<?php while ( $wp_query->have_posts() ) : $wp_query->the_post(); ?>
							<article id="post-<?php the_ID(); ?>" <?php post_class(); ?>>
								<header class="entry-header">
									<h4><a href="<?php the_permalink(); ?>"><?php the_title(); ?></a></h4>
								</header><!-- .entry-header -->

								<?php if ( has_post_thumbnail() ) : ?>
									<p class="entry-thumbnail"><a href="<?php the_permalink(); ?>"><?php the_post_thumbnail( 'thumbnail' ); ?></a></p>
								<?php endif; ?>

								<div class="entry-content">
									<?php
									global $more;
									$more = 0;
									the_excerpt();
									?>
								</div><!-- .entry-content -->
なお、上記の例では、マークされた1行目のコードに示す通り、ブログ一覧の表示をページネーションを可能としたアーカイブページでも表示できるようにしています。
この機能の実現方法については、以下の記事に纏めていますので、ご興味のある方はご覧下さい。

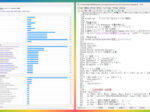
アーカイブページにおいて、コンテンツ表示を行うテンプレートパーツのプログラム「content.php」では、オリジナルに対して以下のような修正を加えています。修正後のプログラムリスト内でマークされた行が追記、および修正したコードとなります。
【content.php – 修正前のオリジナル】
<?php
/**
 * @package _hpb
 */
?>

<article id="post-<?php the_ID(); ?>" <?php post_class(); ?>>
	<header class="entry-header">
		<h1 class="entry-title"><a href="<?php the_permalink(); ?>" rel="bookmark"><?php the_title(); ?></a></h1>
	</header><!-- .entry-header -->

	<?php if ( is_search() ) : // Only display Excerpts for Search ?>
	<div class="entry-summary">
		<?php the_excerpt(); ?>
	</div><!-- .entry-summary -->
	<?php else : ?>
	<div <?php if ( get_post_type() == 'page' ) : ?>id="page-content"<?php endif; ?> class="entry-content">
		<?php the_content( __( 'Continue reading <span class="meta-nav">→</span>', '_hpb' ) ); ?>
		<?php
			wp_link_pages( array(
				'before' => '<div class="page-links">' . __( 'Pages:', '_hpb' ),
				'after'  => '</div>',
			) );
		?>
	</div><!-- .entry-content -->
	<?php endif; ?>

	<footer class="entry-meta">
		<?php if ( get_post_type() != 'page' ) : ?>
		<?php hpb_entry_meta( get_post_type() ); ?>
		<?php endif; ?>

		<?php if ( ! post_password_required() && ( comments_open() || '0' != get_comments_number() ) ) : ?>
		<span class="sep"> | </span>
			<span class="comments-link"><?php comments_popup_link( __( 'Leave a comment', '_hpb' ), __( '1 Comment', '_hpb' ), __( '% Comments', '_hpb' ) ); ?></span>
		<?php endif; ?>

		<?php edit_post_link( __( 'Edit', '_hpb' ), '<span class="sep"> | </span><span class="edit-link">', '</span>' ); ?>
	</footer><!-- .entry-meta -->
</article><!-- #post-## -->
【content.php – 修正後】
<?php
/**
 * @package _hpb
 */
?>

<article id="post-<?php the_ID(); ?>" <?php post_class(); ?>>
	<header class="entry-header">
		<h1 class="entry-title"><a href="<?php the_permalink(); ?>" rel="bookmark"><?php the_title(); ?></a></h1>

	</header><!-- .entry-header -->
	<?php if ( !is_search() && has_post_thumbnail() ) : ?>
		<!-- 検索ページ以外でサムネイル画像があればアイキャッチ画像を追加 -->
		<p class="entry-thumbnail"><a href="<?php the_permalink(); ?>"><?php the_post_thumbnail( 'thumbnail' ); ?></a></p>
	<?php endif; ?>
	<?php if ( is_search() ) : ?>
		<!-- 検索ページなら抜粋のみを表示 -->
		<div class="entry-summary">
		<?php the_excerpt(); ?>
		</div><!-- .entry-summary -->
	<?php else : ?>
		<!-- 抜粋と記事へのリンクを表示 -->
		<div <?php if ( get_post_type() == 'page' ) : ?>id="page-content"<?php endif; ?> class="entry-content">
		<?php the_excerpt(); ?>
	</div><!-- .entry-content -->
	<?php endif; ?>

	<footer class="entry-meta">
		<?php if ( get_post_type() != 'page' ) : ?>
		<?php hpb_entry_meta( get_post_type() ); ?>
		<?php endif; ?>

		<?php if ( ! post_password_required() && ( comments_open() || '0' != get_comments_number() ) ) : ?>
		<span class="sep"> | </span>
			<span class="comments-link"><?php comments_popup_link( __( 'Leave a comment', '_hpb' ), __( '1 Comment', '_hpb' ), __( '% Comments', '_hpb' ) ); ?></span>
		<?php endif; ?>

		<?php edit_post_link( __( 'Edit', '_hpb' ), '<span class="sep"> | </span><span class="edit-link">', '</span>' ); ?>
	</footer><!-- .entry-meta -->
</article><!-- #post-## -->これは参考までにですが、以下はアーカイブ表示を行うテーマのプログラム archive.php において、ページネーションのプラグイン「WP-PageNavi」を使用した場合の修正方法です。
ループ直後の位置が修正箇所となります。以下に、修正前のオリジナルコードと修正後のコードを示します。
【archive.php – 修正前のオリジナル】
			<?php /* Start the Loop */ ?>
			<?php while ( have_posts() ) : the_post(); ?>

				<?php
					/* Include the Post-Format-specific template for the content.
					 * If you want to overload this in a child theme then include a file
					 * called content-___.php (where ___ is the Post Format name) and that will be used instead.
					 */
					get_template_part( 'content', get_post_format() );
				?>

			<?php endwhile; ?>

			<?php _hpb_content_nav( 'nav-below' ); ?>
【archive.php – 修正後】
			<?php /* Start the Loop */ ?>
			<?php while ( have_posts() ) : the_post(); ?>

				<?php
					/* Include the Post-Format-specific template for the content.
					 * If you want to overload this in a child theme then include a file
					 * called content-___.php (where ___ is the Post Format name) and that will be used instead.
					 */
					get_template_part( 'content', get_post_format() );
				?>

			<?php endwhile; ?>

<!-- HPBのページナビを削除
  php _hpb_content_nav( 'nav-below' ); -->

<!-- for WP-PageNavi -->
<?php if(function_exists('wp_pagenavi')) { wp_pagenavi(); } ?>
プラグイン「WP-PageNavi」の詳細については、以下の記事で説明しています。
以上の事を踏まえ、WordPress 日本語版パッケージのためのマルチバイト機能を拡張するための必須プラグイン「WP Multibyte Patch」は導入済みである事を前提とし、テーマの function.php へのスニペット追加による Auto Limit Posts Reloaded の機能を代替する方法を以下で説明します。
テーマの function.php へのスニペット追加
Auto Limit Posts Reloaded の機能をテーマのプログラムで代替するため、functions.php に以下のスニペットを追加します。
// 「続きを読む」をカスタマイズするためのコード
function my_excerpt_more($post) {
    return  '... <a href="'. get_permalink($post->ID) . '">' . ' 続きを読む »' . '</a>';
}

// 抜粋(the_excerpt())を指定文字数でカットして表示するコード
function my_trim_excerpt( $text = '' , $cut = 130 ) {
    global $post; // ★2026.07.05 追加(WordPressの標準の記事データ読込)

    $raw_excerpt = $text;
    if ( '' == $text ) {
        // 抜粋が未設定の場合、記事から取得
        $text = get_the_content('');
        $text = strip_shortcodes( $text );
        $text = apply_filters('the_content', $text);
        $text = str_replace(']]>', ']]>', $text); //セクション終端のエスケープ
        $text = strip_tags($text);
    }
    $excerpt_mblength = apply_filters('excerpt_mblength', $cut );
    $excerpt_more = my_excerpt_more( $post );
    $text = wp_trim_words( $text, $excerpt_mblength, $excerpt_more );

    return apply_filters('wp_trim_excerpt', $text, $raw_excerpt);
}

// the_excerpt()にフィルターをかけるコード
remove_filter('get_the_excerpt', 'wp_trim_excerpt');
add_filter('get_the_excerpt', 'my_trim_excerpt' );
上記の PHP スクリプトで、マークされた7行目のフィルターフックを行うためのコールバック関数において、パラメータの数値定義(130)が記事の冒頭から抜粋する文字数です。
これにより、記事一覧表示において、記事の文字数が130文字を超える場合は、記事の最後尾に「… 続きを読む »」のリンク表示がされるようになります。
マークされた16行目の関数コール「text = str_replace(‘]]>’, ‘]]>’, $text);」は、何も変換されないため、一見無意味なコードのように見えますが、Jacascript 内の変数定義などで “]]>” という文字列を XML パーサーが CDATA セクションの終了と誤って解釈するのを防ぐためのエスケープ処理を意味しますので、この行は削除しないようにして下さい。
ちなみに、上記スニペットの代わりに、以下のように抜粋の文字数(WordPressのデフォルトは、110文字)を指定することも可能です。
その場合、抜粋を切り出し、最後に「[…]」の文字列が追加されます。但し、「… 続きを読む »」のリンク表示はされません。
/* 抜粋の表示文字数を130文字に変更(Googleは120文字)
---------------------------------------------------------------- */
function edit_excerpt_mblength($length)
{
     return 130;
}
add_filter('excerpt_mblength', 'edit_excerpt_mblength');
抜粋記事の表示
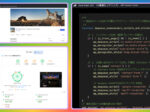
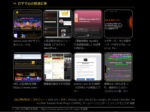
テーマの functions.php へのスニペット追加で対応した後、プログ一覧で記事の抜粋記事を表示させた例を以下のギャラリーに示します。以下の例では、記事の文字数が130文字を超えるケースです。
ブログ一覧