Final update date: September 15, 2025 at 2:06 PM
In order to strengthen security, we installed a security camera in the store of Shinjuku 2-chome Popcorn.
Actually, for security cameras, I was recommending a proper thing for business use, but the other day, a popcorn hina mama was recommended by a seller in Akihabara, and I bought a cheap security camera made in China.
The lowest price at price dot com is 3,250 yen, and the market price is about 4,000 yen on average, so is it a "toy security camera" in terms of price? It is said.
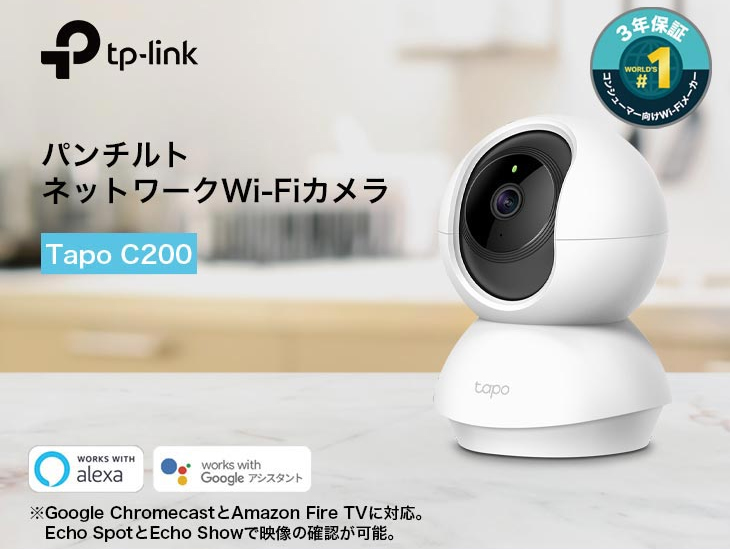
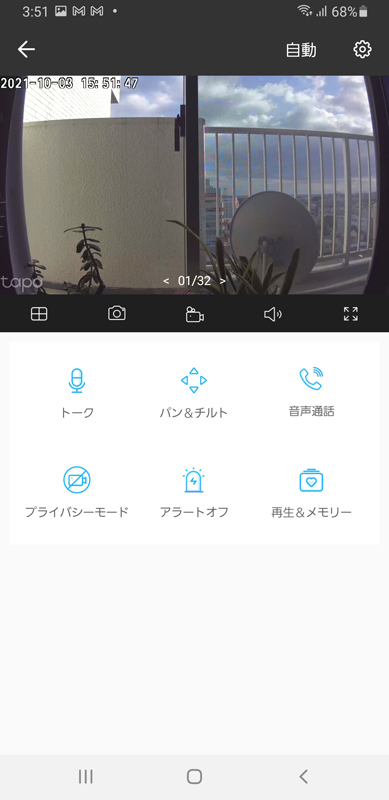
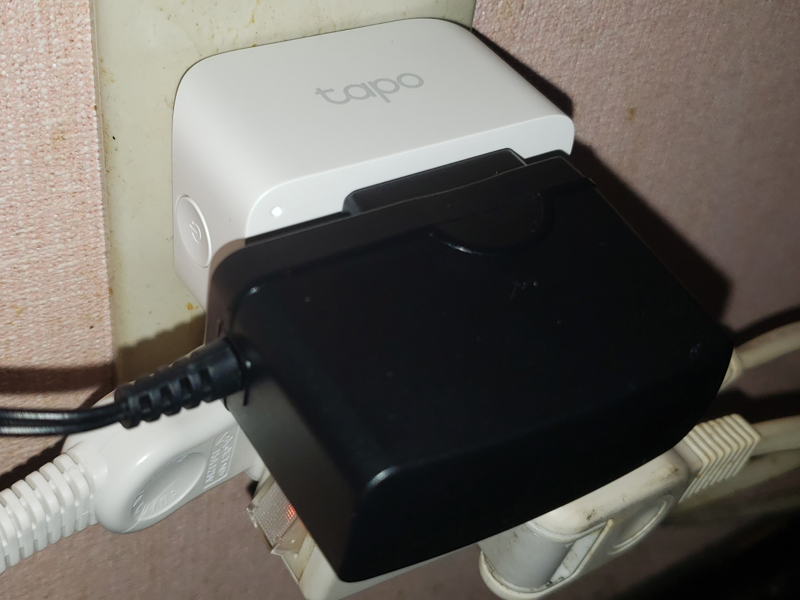
The security camera is a pan tilt-compatible network Wi-Fi camera equipped with the swing function of TP-Link (Shenzhen, China) Tapo C200 Is.
However, there is only a simple installation manual in this product, and although I bought it, it seemed to be troubled with installation, so well, it was better than not, so I decided to take on the installation work of the security camera.
If it is for applications such as watching over pets and children in a private home, such a cheap security camera may be good, but if you are thinking of installing it as a surveillance camera in an office or store, we recommend other professional security cameras if possible.
For security cameras for professional use, please refer to this blog⇒ Replacing security cameras
Now, as a result of playing with the Tapo C200 in various ways, I know the whole story of the Tapo C200, such as the useless part and the part that can be used unexpectedly.
It was made only in China, and it was hard to install by not having a proper manual, and even if the installation was successful, the line was cut from the server after a certain period of time, and it was found that it was quite a habit person such as not being able to use it properly.
However, in order to make it usable as a security camera for business use for the time being, we managed to use it in the introduction of IOT devices such as smart plugs.
Therefore, we have compiled a detailed review of this camera, including the difference from general professional security cameras, so if you are thinking of installing it as a security camera, please refer to it.
Tapo C200 Features
Tapo C200 is available in versions 1 and 2, and the model I purchased this time is V2. You can see which version is in the string below the barcode printed on the bottom of the console. If "JP/2.0" is mentioned, it is V2.
Tapo C200 (V2) features:
- High-definition HD video: Shoots 1080p high definition and details.
- Pan & Tilt: Swings of 360º horizontally and 114º vertically.
- Night vision support: Watch and record video at night or in dimly-light conditions.
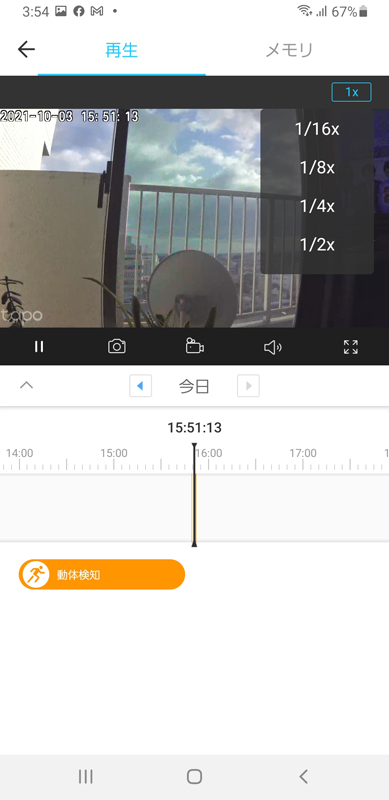
- Motion detection function: The camera also has an operation detection function, and when motion is detected, it notifies through the application.
- Alarm function: If you see a suspicious person, use the alarm sound and light to alert you.
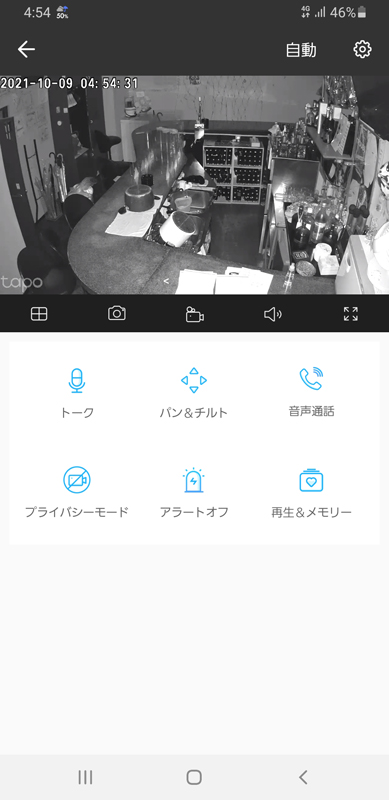
- Two-way calls: Built-in microphone and speakers allow you to talk over the screen with the app.
- Secure storage: Supports microSD cards up to 128GB and can record 384/16 days* (SD card sold separately)
- Voice Control: You can check the video hands-free by linking with Google Assistant or Amazon Alexa. (Not available in all languages and countries)
What's good about tapo C200
The benefits of deploying tapo C200 include:
- Bakuyasu. Cospa is probably the no. 1 in the industry. For business use, it costs at least 60,000 yen or more (DVR + HDD + security camera + BNC coaxial cable + monitor, separate construction cost), but as long as there is a net environment, it can be installed at a cost of 6,000 yen or less including SD card.
- Since it is a Wi-Fi connection, there is no need to lay or connect BNC coaxial cables. (However, connection to the power cable is required.)
- Easy to install, no construction to a specialist.
- This is enough for use for home use, such as watching over pets and children.
- The operability of the app is good and easy to handle.
- It comes standard with a two-way call function that is not equipped with a professional security camera.
- An unusual manufacturer 3-year warranty. ⇒ In fact, it is difficult to contact the manufacturer, and the purchaser will bear the shipping fee for the exchange
What's wrong with tapo C200
For the time being, the bad outing of tapo C200 is also listed below. (It is unavoidable considering the price)
- It cannot be used without a Wi-Fi environment.
- Because it can only connect to Wi-Fi in the 2.4 GHz band, it is subject to radio interference from microwave ovens, cordless phones, Bluetooth terminals, USB 3.0 connected devices, etc. Communication speed is also slow.
- The recorded content cannot be viewed directly from a PC or monitor by operating the mouse (live video can be viewed with restrictions only via the cloud such as Google Home). However, like other network cameras, this camera cannot be viewed via http streaming from a web browser, but since it supports RTSP, it can be viewed with other general-purpose software (such as Blue Iris). However, it is necessary to set up a router and RTSP/ONVIF (camera control on port 2020), which is a high hurdle for ordinary users.
- You can only watch from a smartphone or tablet via the cloud with the Tapo app. If you remove the SD card from the camera, you can watch it from your PC, but it's not very practical. His DVR, which is a security camera system for business use, has a built-in server function (requires 80 ports open in router settings, IP fixation and DDNS settings), and you can directly access the DVR via the Internet and view recorded data.
- The cloud is China, so it's creepy. Access to the camera is via a server located in China and is not directly accessible to the camera. In addition, there is no possibility of incurring cloud usage fees in the future.
- The privacy policy says outrageous things, and all personal information such as phone calls, sms, and postings on social media is designed to be sent to the Chinese (Communist Party). You may not use the Tapo App unless you agree to this Privacy Policy. And, the permission of the position information is forced.
- When continuously viewing a video with a live camera, the video stops after a certain period of time, so it is necessary to tap the screen and re-load each time. Therefore, it is not suitable for real-time video monitoring. (Cannot be used for business use)
- Recording is possible only when the camera and TP-Link server are connected. Time disconnected from the server is not recorded.
- After a certain period of time, the connection from the TP-Link server will be cut off, and remote control from the Tapo app will no longer be possible. You have to turn off the camera and restart it manually. Therefore, it is essential to set "automatic restart" every morning, but since the server is unstable, there is no guarantee that it can be operated stably. In addition, since the automatic restart time can only be set within the range of 2:00 to 4:00 in the morning, it cannot be used at stores that are open late at night.
- Up to four cameras can be connected. For business use, more than 8 units can be connected.
- Up to four units can be monitored simultaneously with the app, but if you set full HD image quality (1080p), it is actually limited to 3 units because it drops or stops. The app recommends setting it to HD quality (720p), which is ideal for streaming videos.
- The angle of view is quite wide and there is about 110 degrees in actual measurement, but the distortion of the periphery is tremendous. The app can correct distortion, but it hardly works.
- The camera's color balance is wrong. Slightly blue is strong.
- The sound quality of the microphone is poor. It seems to be recorded in the format G.711, but the sound cracks and it is hard to hear.
- The recording period is as short as 384 hours (16 days). For business use, you can store high-definition videos for 3 to 6 months by installing a large-capacity HDD (4TB, etc.).
- Recording to microSD card is less reliable than HDD. Read/Write to the SD card has a short life due to the H/W specifications, so it may become unusable in one year at worst.*1
- The appearance of the camera is "Security camera!". In the case of indoor use, the whole is a black dome type, or recently the appearance that is inconspicuous is mainstream.
- The manual only attaches the "Easy Configuration Guide", and does not have a proper Japanese manual attached. (However, there is an unfinished theory of a slightly strange Japanese on the net⇒ Tapo Camera User Manual )
- There is no function to extract recorded data. Professional DVRs are equipped with a function to output the data of a specified date and time from the recorded data to an external memory (USB memory).
*1 SD cards and micro SD have a lifetime
SD card has a lifetime!? Lesser-known SD card selection points
It is said that the maximum number of writes of nand flash memory elements used in SSDs and SD cards is 100,000 for SLC (Single Level Cell) chips, 10,000 MLC (Multi Level Cell) chips, and 1000 triple level cell (TLC) chips. 1000 times is the same as the DVD-RW and BD-RE rewrite limit. General SD cards are TLC, MLC and usually have no SLC.
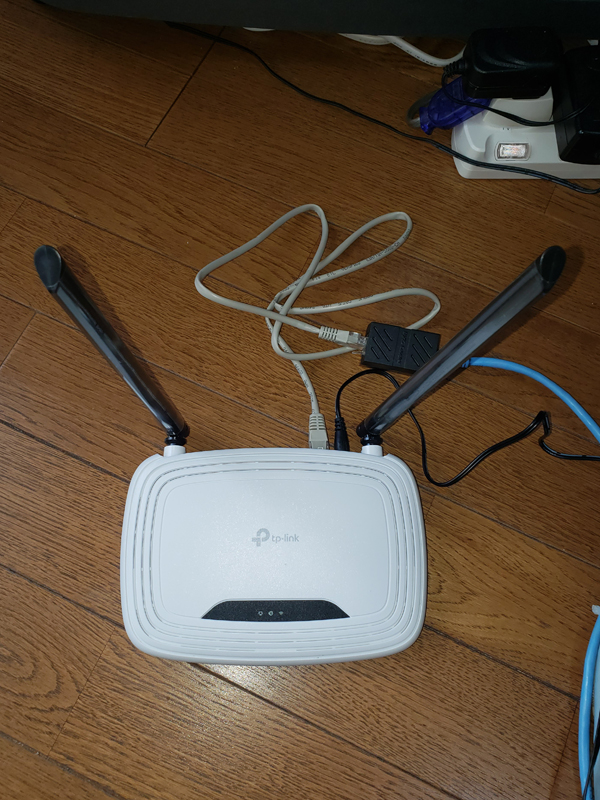
Development of tapo C200 communication environment ( installation of TP-Link TL-WR841N )
In order to use Tapo C200, connection to Wi-Fi in the 2.4GHz band is a prerequisite.
The other day, I tried to connect at the shop, but the router (bridge connection) of the shop unfortunately failed to connect because only radio waves in the 5GHz band were coming out.
I don't even know the password for the router, so if I initialize the router and enable the 2.4GHz SSID, the problem will be solved. , This time I decided to purchase a new router and add a 2.4GHz band access point.
Router than Amazon TP-Link TL-WR841N I was able to purchase it for only 1,680 yen. TP-Link is really cheap 😅
The bridge mode setting of the TL-WR841N is done from the router management screen instead of the H/W switch.
It is necessary to connect to the router via Wi-Fi or cable (WAN terminal connection at the time of setting), and then switch to bridge mode from the setting screen, which takes some time.
After changing to bridge mode, the cable should be connected to the LAN port and not to the WAN port.
TP-Link's products are cheap and good, but overall the manual is poorly maintained, so I think that there are many people who stumble in the settings. The manual does not even include the initial login ID/password (admin/admin) of the router.
As shown below, I decided to make a 2.4GHz access point at home and complete the Tapo C200 camera settings at home.
Tapo C200 Settings
Tapo C200 camera settings are made using the dedicated app "Tapo". You can download the app for Android/iOS.
Instructions on how to set up a Tapo camera can be found at the following link:
When using the TP-Link app, you must register your TP-Link ID (email address) and log in.
Therefore, since there is a problem with using a personal email address, we have prepared an email address (e.g. tp-link@senris.com) dedicated to administrators on our server in advance.

If camera settings such as pairing fail during operation, you may not be able to proceed to the setting screen unless you reset the camera. The main failure example is that only his 5GHz SSID is registered on the router, and there is no 2.4GHz radio wave, and the Tapo app does not display his SSID list for pairing, This is a case where you can't.
In that case, you need to press the reset button and do a camera reset.
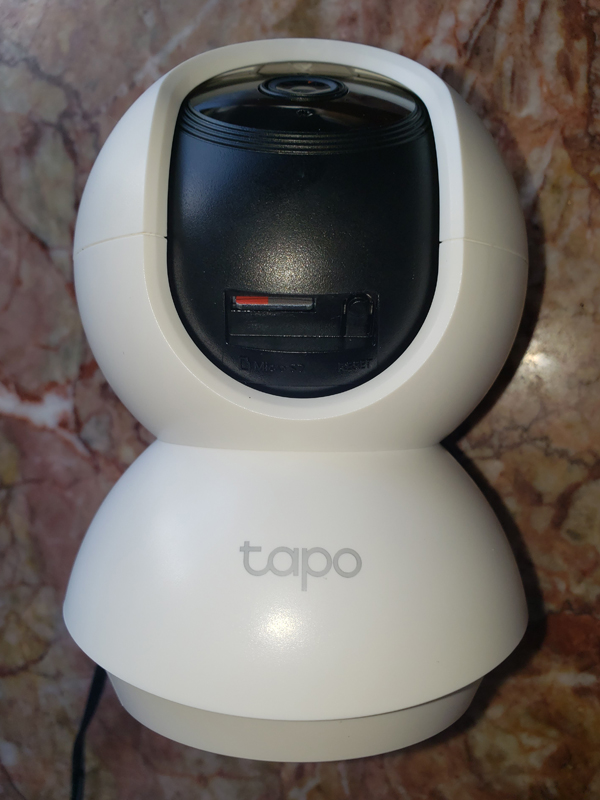
The reset button is located on the right side of the MicroSD card, and if you press and hold this button for more than 5 seconds, a notification sound will play and the camera will be reset.
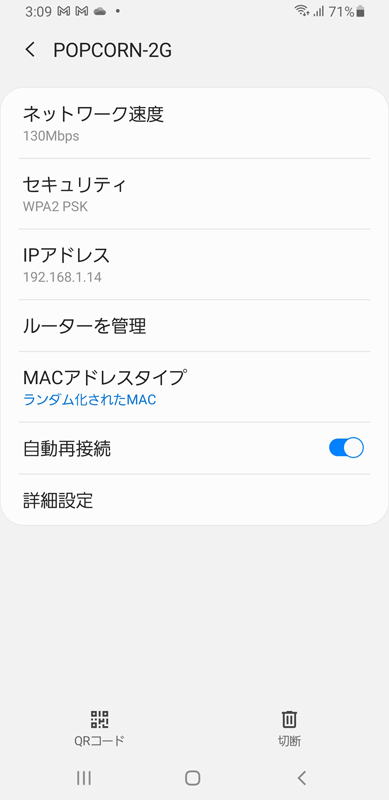
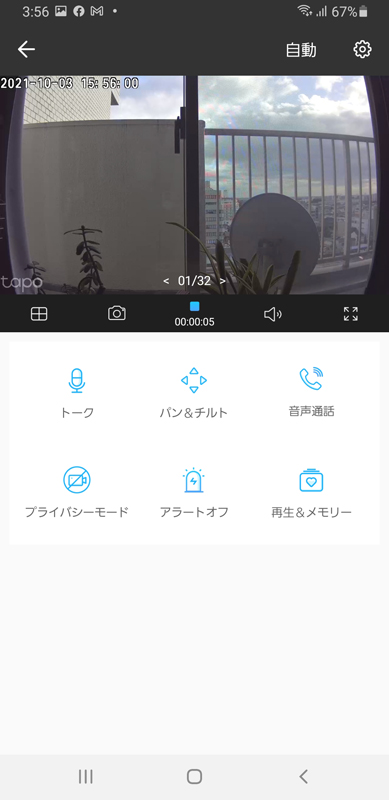
The following gallery shows the settings screen immediately after the successful pairing in Tapo's network settings.

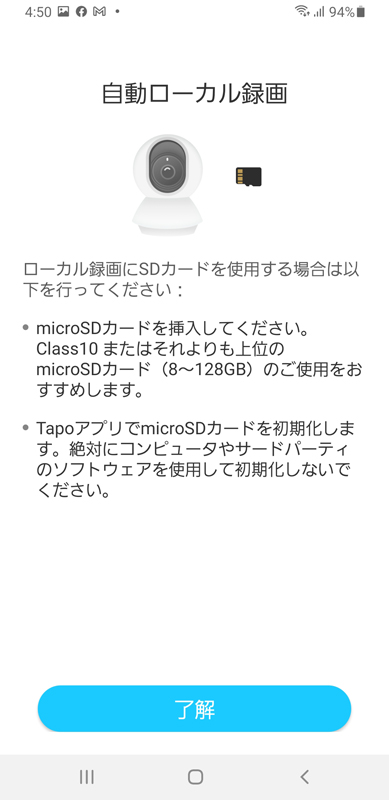
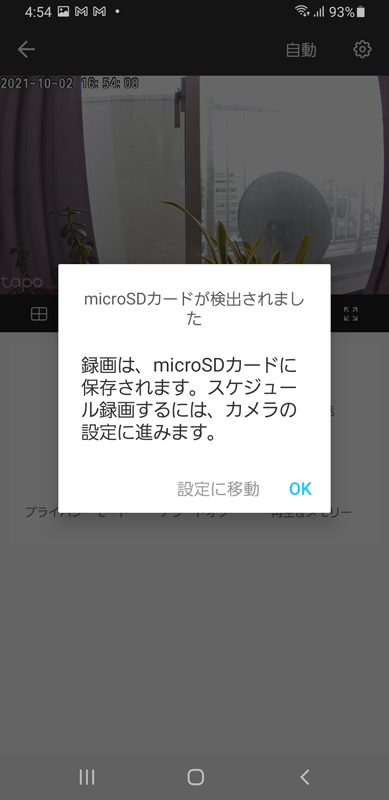
Attaching the SD card to the Tapo C200
A Micro SD card must be inserted for local recording on the Tapo C200.
This time, I used a SanDisk Micro SD card (128GB/Class 10) purchased from Amazon for 2,040 yen.
SD cards that are usually sold are TLC and MLC chips with short lifespans, so if you want to use them more stably for a long time, the price will be a little higher, but we have adopted a highly reliable MLC chip. I think it would be better to choose one.
To insert the Micro SD card, manually tilt the camera upward and insert it from the bottom of the camera as shown below.
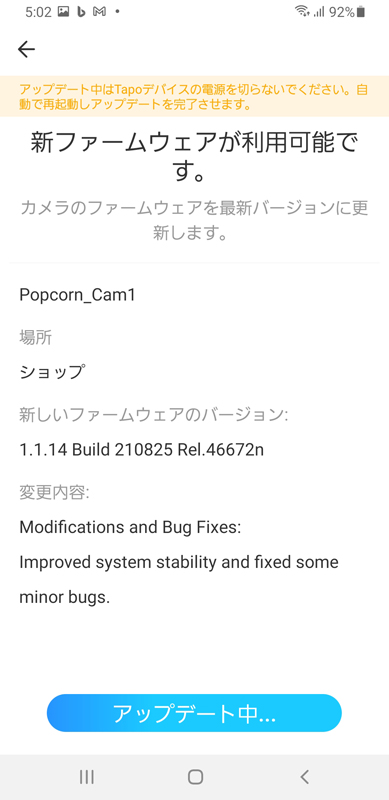
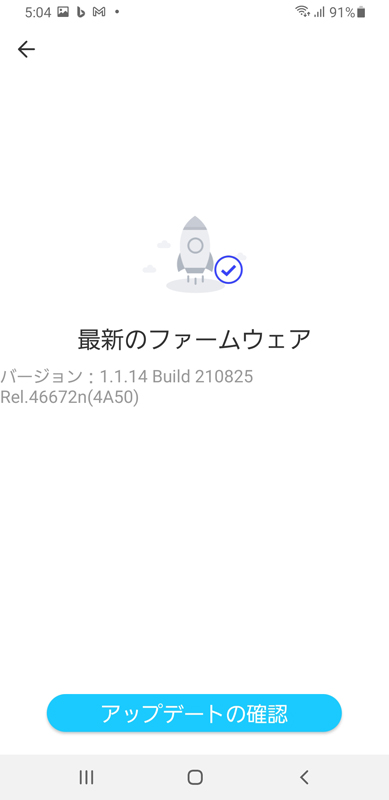
Tapo C200 firmware update
To keep your Tapo C200 up-to-date, use the Tapo app to update the firmware.
If the Tapo app has a firmware update notification, update the Tapo C200 firmware as follows:
2023.12.09 Added
Regarding firmware updates, automatic updates are currently available in the Tapo app settings.
Please note that when logging in to the Tapo app as an administrator, there is a limit of 2 people for security reasons.
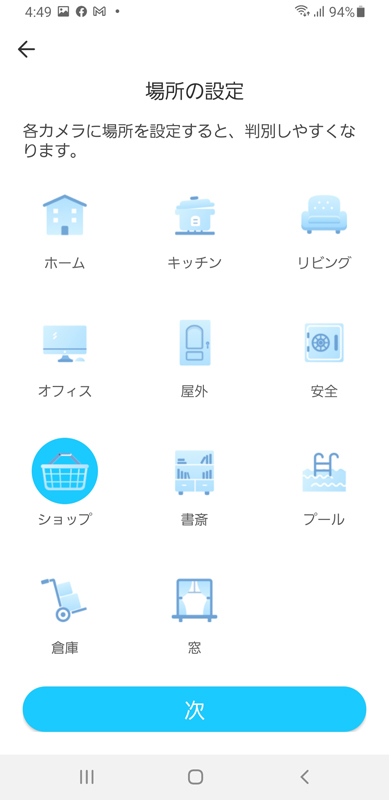
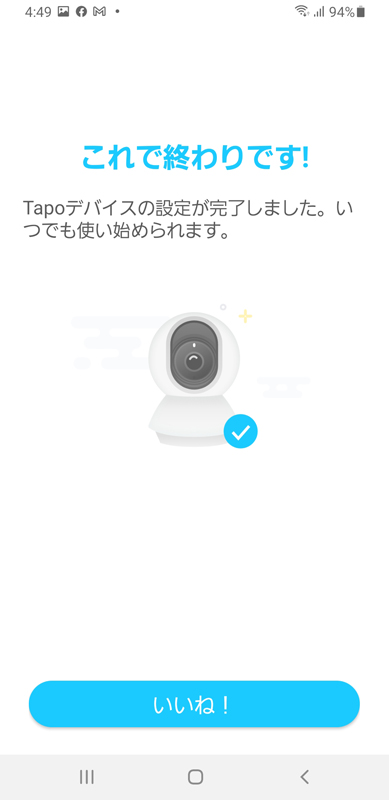
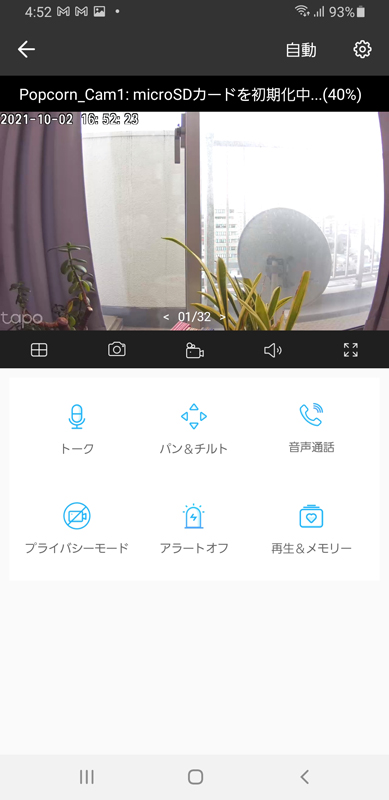
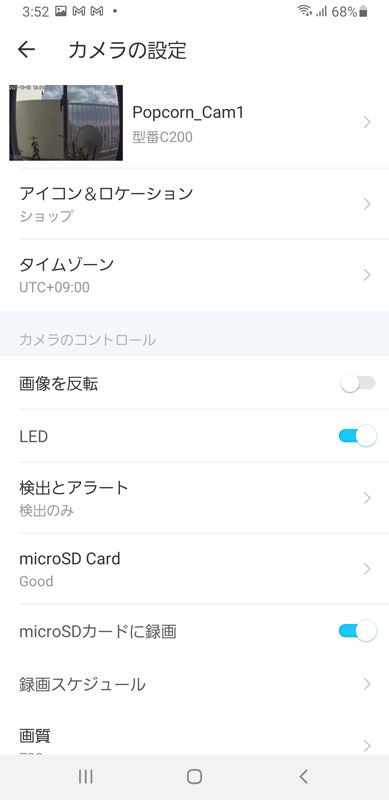
Camera settings for tapo C200
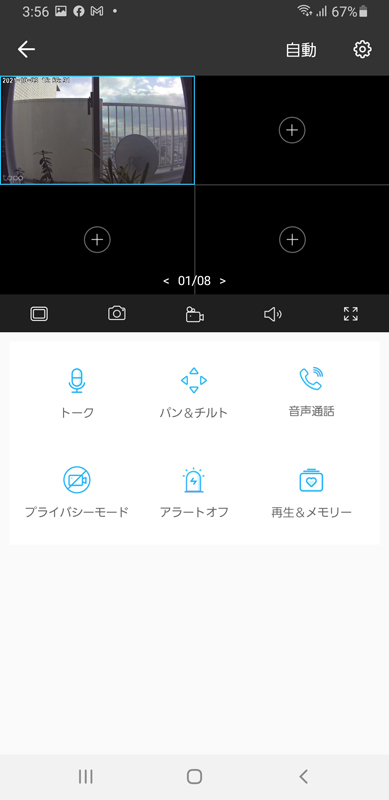
After setting up the Tapo C200, set up the camera from the Tapo app. The gallery below is a screen shot of the camera settings.
To initialize the camera, click ⚙ (Camera Settings).
For the quality setting, I set it to the recommended HD quality (720p). Full HD (1080p) can also be selected, but there are concerns that frames may be dropped and the connection may become unstable, and packets may be wasted. .
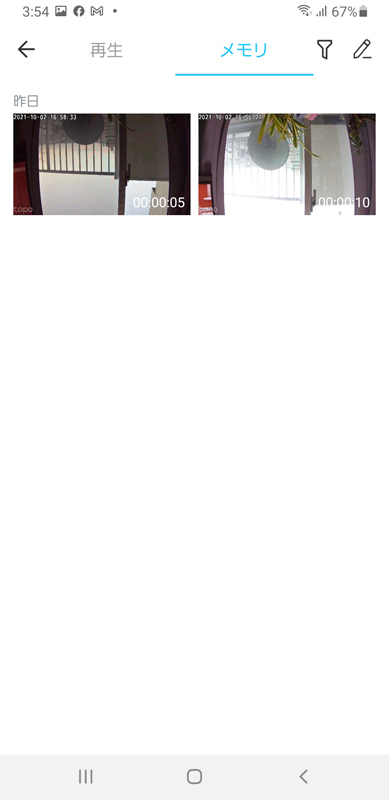
As for the recording method, in order to save data capacity, automatic recording is set by motion detection (set without notification from the application).

Installing cameras and routers in physical stores
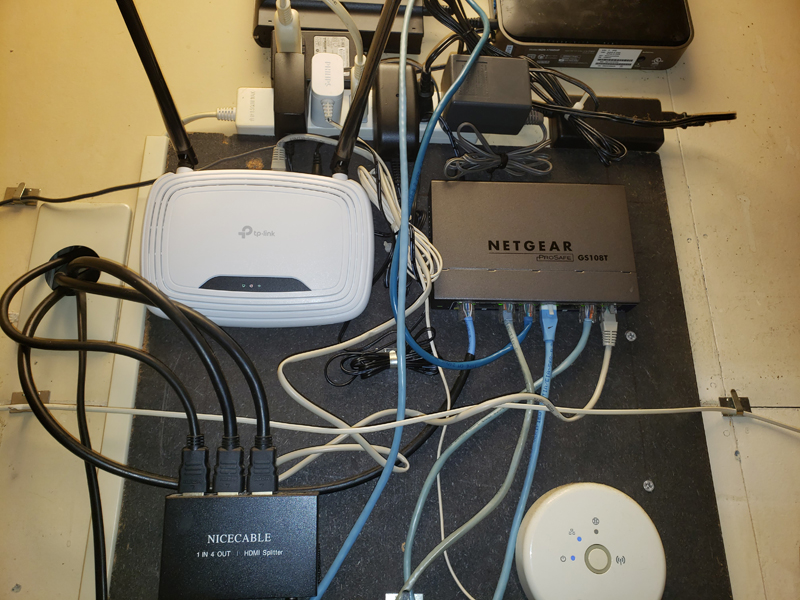
After setting up at home, I installed a camera (Tapo C200) and a router (TP-Link TL-WR841N) in the physical store as follows.
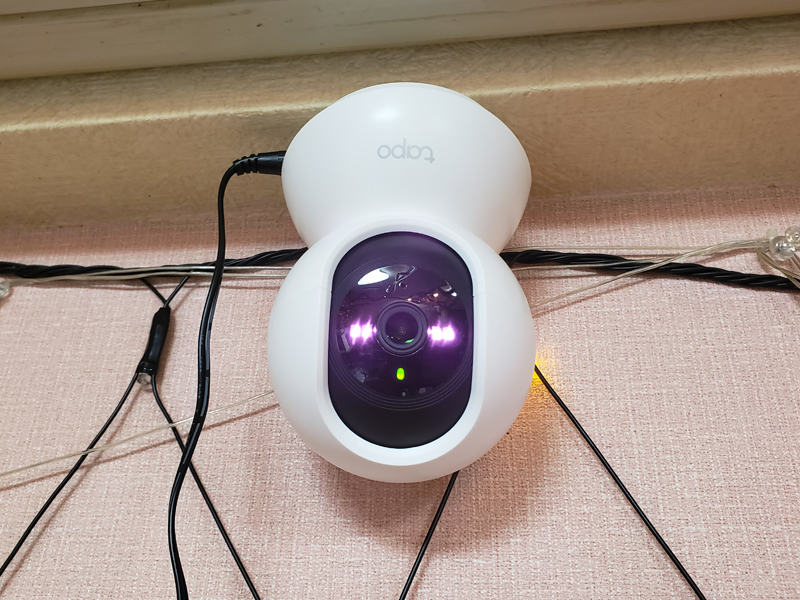
To mount the C200 on the ceiling, use the included mounting template to locate the screw holes and then attach the mounting base first. Rotate the C200 into the mounting base and screw it in to complete the ceiling installation.
There is one caveat here. Once the C200 is screwed in, removing the main body requires grip and tricks. I was able to remove it, but it seems that there are people who are having trouble removing it, so please be careful when attaching it to the ceiling.
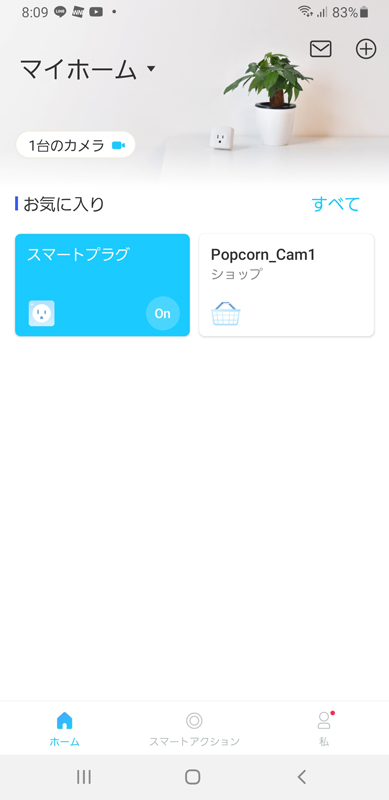
Install smart plugs (Tapo P105/A) and set up cameras in your store
Smart plugs and camera settings were installed in the popcorn store as follows.
The Tapo C200 will disconnect the session from the TP-Link server after a certain period of time, so the automatic restart setting of the C200 is recommended.
However, this function can only be set an automatic restart time within the range of 2:00 to 4:00 in the morning (during our business hours), so it cannot be used in stores such as late night business like our store. This time setting seems to assume the use in the general home.
Unfortunately, the recording function does not work when the C200 is disconnected from TP-Link's server.
TP-Link seems to be able to disconnect the line from the server and go offline after a certain amount of time (more than 12 hours) to reduce the load on the server. The cause of this has not yet been determined as to whether it depends on the cloud specification, individual differences, or the net environment.
The C200 connects to the server only when it starts up, so the only way to reconnect with the server is to restart the C200.
Therefore, in order to manage the power supply of the C200, we urgently decided to use a smart plug, which is one of the IOT devices. TP-Link Tapo P105/A I decided to install.
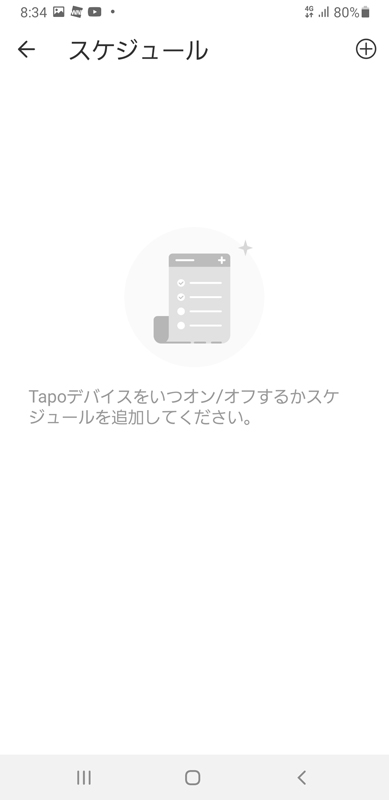
You can take advantage of the scheduling feature of this smart plug to force the Tapo C200 to restart at the specified time.
There are a few caveats regarding the installation of the P105. First of all, the Wi-Fi only supports 2.4GHz, and the plug has + and - polarities, so you can plug it directly into a wall outlet instead of a normal cable tap. , please be careful.*2
*2 Advantages of matching the polarity of AC power supply
Is there polarity in the outlet?
To prevent electric shock
The outlet has polarity, with Cord (ground) on the left and Hot (ungrounded) on the right.
If the polarity is reversed, a voltage may exist in the case of the equipment that should have been ground (0V), and the current may flow at the moment of touching and be electrocuted.
When connecting the P105 to a cable tap, it is necessary to replace it with a cable tap corresponding to polarity because it does not stick to cable taps that do not clearly indicate polarity.
Although there are problems, if you are using other TP-Link products, you can manage the connected devices collectively with the Tapo app, so there is also a convenient aspect.
For P105, you add a P105 device using the Tapo app, and only install Bluetooth is turned on to set up the network. For detailed instructions on how to set up the P105, please refer to the article linked below.

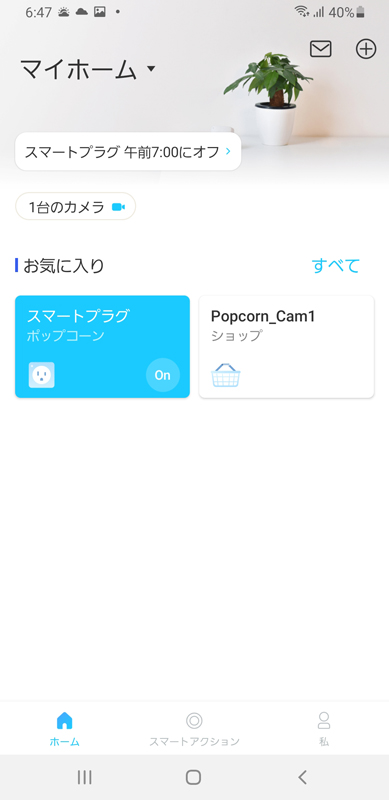
Last time, I completed pairing with the router when installing the C200, so the installation was easy. After successful installation, a "smart plug" will be added to the home screen of the Tapo app.
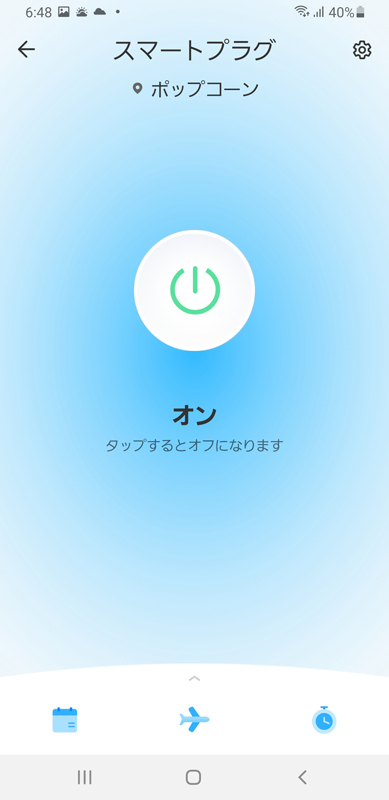
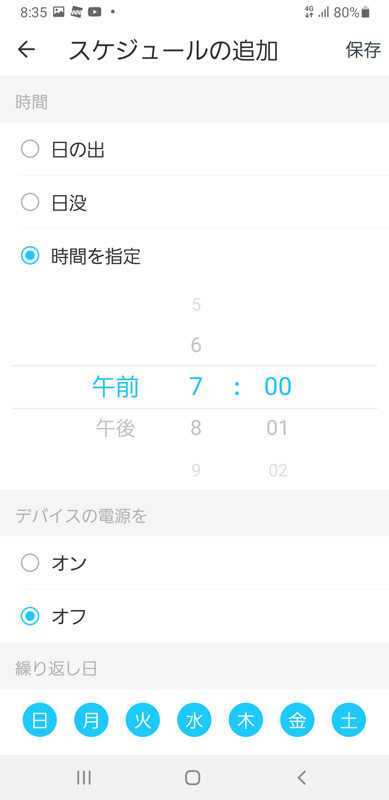
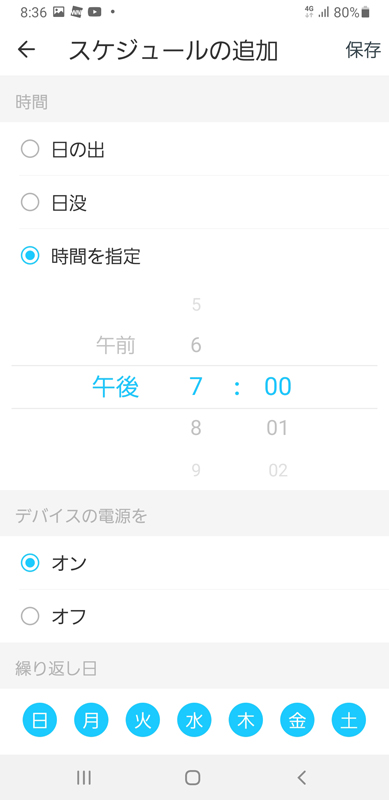
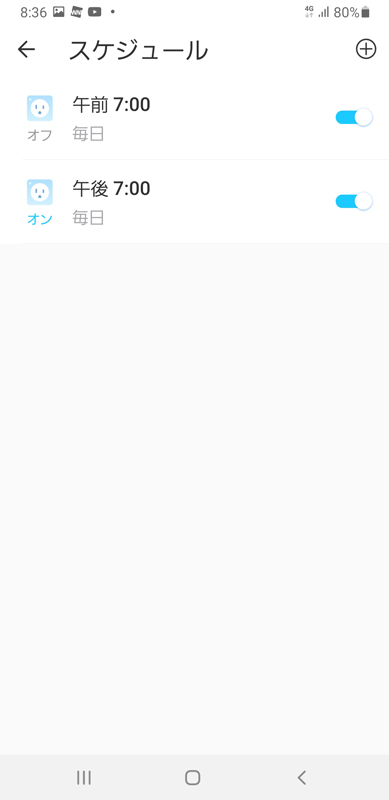
The P105 app allows you to schedule when the Tapo C200 powers off and on. You can also manually control the power ON/OFF.
For now, we scheduled a daily uptime of 12 hours to avoid disconnection due to load restrictions from the TP-Link server.
When the C200 is turned on by controlling the smart plug, the camera rotates 360° for calibration and then stops at the previously manually secured position.
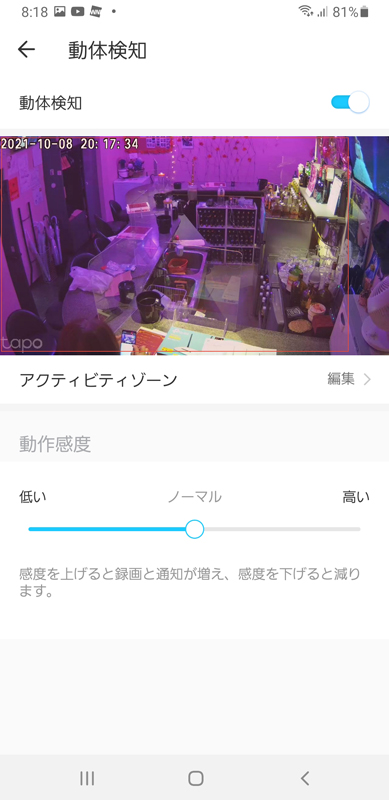
In the C200's camera settings, exclude the TV area in the activity zone setting for motion detection so that it does not react to the TV screen. In addition, the “tapo” logo displayed at the bottom left of the live view is still an obstacle, so I turned it off later in the settings (advanced settings ⇒ screen display settings ⇒ logo display OFF).
The gallery below shows the installation and settings of smart plugs, as well as the Tapo app settings screen.
Radio Interference from 2.4GHz Cordless Phones and Microwave Ovens
The 15-year-old Panasonic cordless phone (VE-GP20-S/KX-FKN523-S) installed in the popcorn store occupies 2.4GHz radio waves, so it is also possible to use the 2.4GHz band Wi-Fi. It was found that the wireless LAN router used (bridge mode) and the lighting system of Phillips Hue (ZigBee standard) are also suspected of causing radio interference.
The phone has a hopping function that changes the frequency band every time to prevent eavesdropping, adversely affecting all channels of communications equipment that use the 2.4GHz band.
Although it may be improved by changing the channel (frequency, band) of the router or the installation position, it is not a fundamental solution, so we think that replacing a cordless phone is the best solution.
Therefore, we decided to replace it with a new cordless phone (Panasonic VE-GD27DL-W) using the 1.9GHz radio wave, which is currently the mainstream.
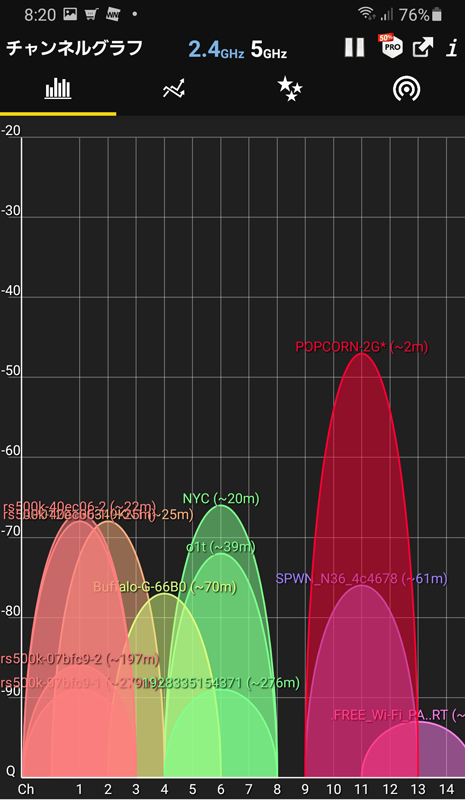
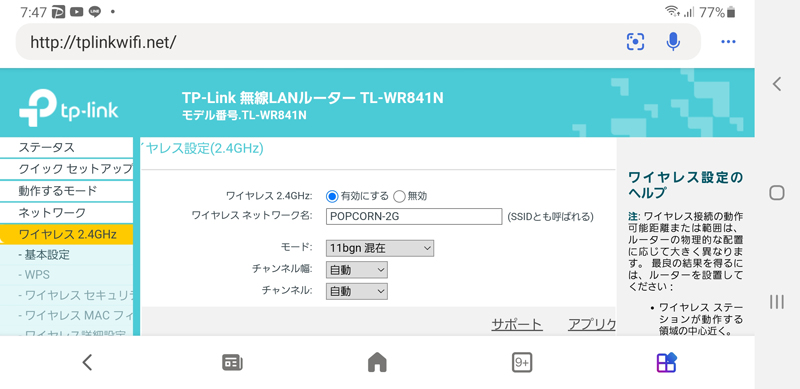
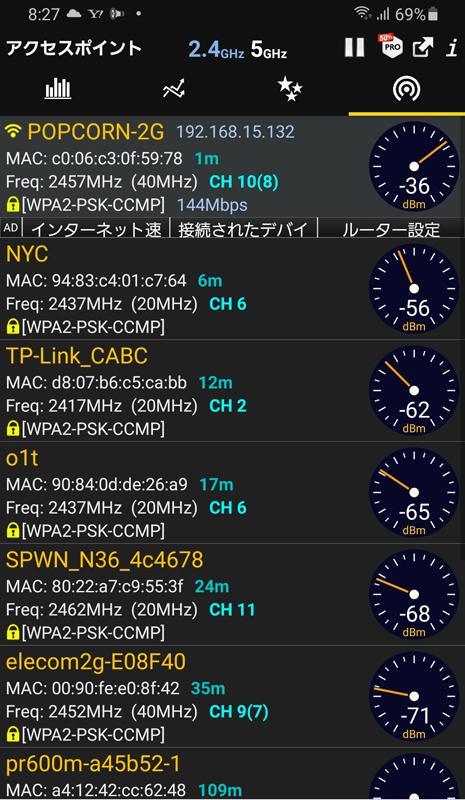
If there is no radio wave interference, the router automatically assigns the channel to be used to an empty channel, so there is no need to set it manually, but for the time being, you can use the microwave (2450MHz) of the microwave oven and the wireless LAN of other stores. In order to minimize the interference, I fixed the frequency band to channel width 20MHz / channel 11 (2462MHz) in the wireless 2.4GHz setting of the wireless LAN router (TL-WR841N) as shown below.
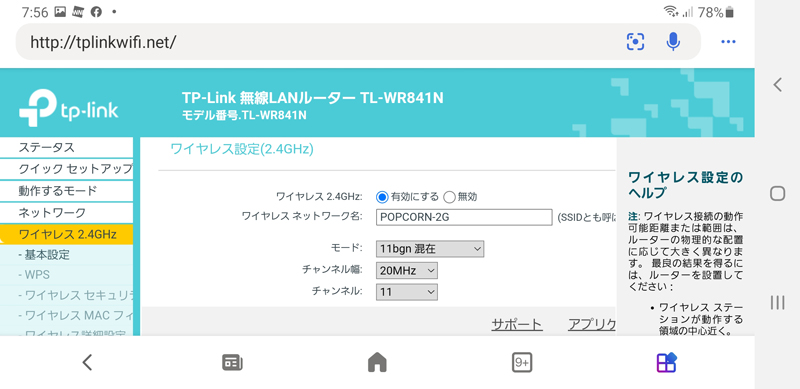
Initially, it was set to Channel 1 (2412MHz), but when I checked the congestion status of the channel with the WiFi analyzer shown below, it was very crowded, so I changed it to Channel 11 (2462MHz).
Channels 1 to 13 (1 to 14 channels for some products) are available for the 2.4GHz band, but unfortunately most of the frequencies in channel 1 interfere with channels 2 to 5. , if you want to avoid interference, you can effectively only use 3 (some products have 4) channels: 1, 16, 11 (14). Therefore, the current situation is that the 2.4GHz band channels are very congested.

Radio interference with ZigBee on Phillips Hue bridge
I solved the 2.4GHz interference problem on my cordless phone, but it turned out that the Hue bridge's ZigBee was also interfering. A typical symptom is that Phillips Hue's wireless switch operation causes his C200 in the Tapo app to go offline.
For radio wave interference with ZigBee, you should change the channel used by ZigBee in the Hue bridge settings, but since we are not involved in the Phillips Hue system, we will reconfigure the 2.4GHz router (TL-WR841N). bottom.
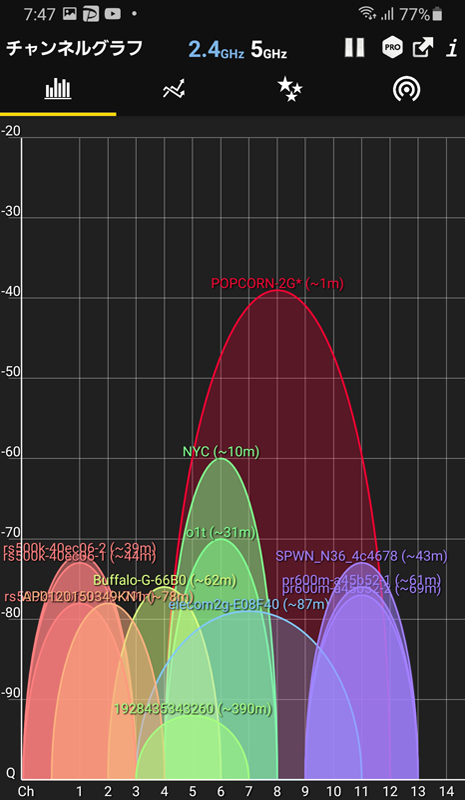
As shown below, as a result of selecting Auto for channel width and channel in router settings, channel bonding was performed at 40MHz and channel 8 was automatically selected.
As a result of the verification, the interference with ZigBee disappeared because channel 11 was released.
In addition, channel 8 (2457MHz) overlaps the frequency band of the microwave oven, but since there are no other free channels, I would like to operate with this setting for the time being.
Popcorn network configuration
With the addition of network equipment, popcorn's network configuration is as follows:
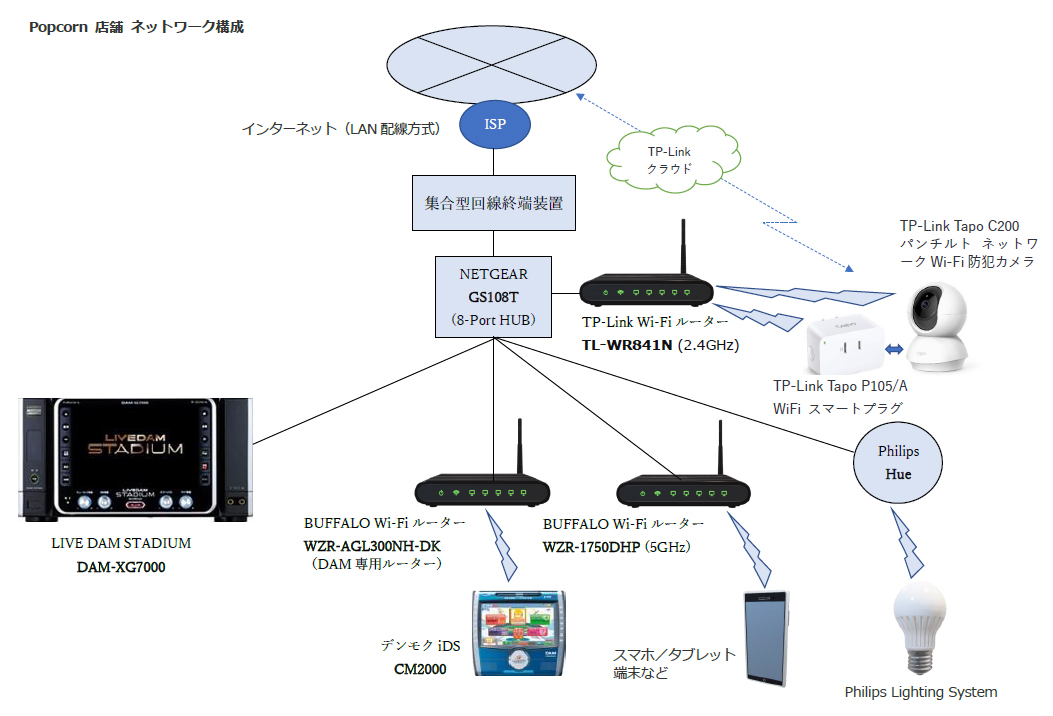
2025.08.29 Added / Updated 2025.09.15
This machine broke after just over three years of use. There were many problems that were noticeable from the start, such as the internet being cut off in the middle.
Therefore, we are currently working on the TP-Link company's "Became the C530WSI'm replacing it with ".
As mentioned in the article linked to the manufacturer's website below, the newly replaced model has a high resolution of 5 million pixels, and can be installed outdoors, wired cable connections, and has a high-precision AI detection function.
Tapo C530WS | Outdoor Pan Tilt Security Wi-Fi Camera | TP-Link Japan
For indoor models with similar specifications, please see below:Became C232" is on sale.
Tapo C232 | Pan Tilt Smart AI Wi-Fi Camera | TP-Link Japan